Author: globopicks

  • Mastering Bold Eyeliner: Techniques for a Dramatic Look

    Mastering Bold Eyeliner: Techniques for a Dramatic Look

    Introduction

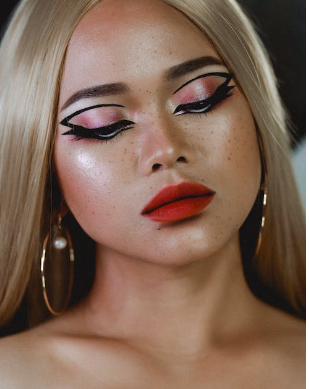
    Bold eyeliner has the incredible power to transform your entire makeup look. When applied skillfully, it can define your eyes, add intensity, and create a captivating focal point. If you’re seeking to master the art of bold eyeliner for that dramatic, attention-commanding look, you’ve come to the right place. In this guide, we’ll delve into various techniques, tips, and tricks that will empower you to create stunning bold eyeliner looks that exude confidence and style.
    Understanding Different Eyeliner Types

    Before diving into the techniques, it’s important to understand the different types of eyeliners available. Liquid eyeliners offer precise lines but require a steady hand. Gel eyeliners give you more control and are perfect for creating bold, winged looks. Pencil eyeliners, on the other hand, offer versatility and are great for smudging, giving a softer effect. Depending on your preference and comfort level, you can choose the best type to achieve that bold and dramatic look.

    Essential Tools and Products

    To achieve a flawless bold eyeliner look, you’ll need the right tools and products. Quality eyeliner brushes or applicators are essential for precise application. Consider investing in a brush with a fine tip for liquid and gel liners. When it comes to eyeliner products, opt for those with rich pigmentation that ensure your lines are bold and impactful.

    Preparation: Primer and Base

    Just as an artist primes their canvas, you need to prime your eyelids before applying eyeliner. A primer helps create a smooth surface, ensuring your eyeliner stays in place all day. Additionally, using an eyeshadow base can intensify the color of your eyeliner and prevent it from smudging.

    Creating the Perfect Canvas: Eye Makeup

    Bold eyeliner works best when it’s complemented by well-executed eye makeup. Start by applying a neutral eyeshadow base, followed by the eyeshadow shades of your choice. Blending is key here, as it creates a seamless transition between the eyeshadow and eyeliner, enhancing the overall impact.

    Mastering Basic Eyeliner Techniques

    For beginners, mastering basic eyeliner techniques is the first step toward achieving a bold look. Start by tightlining, which involves applying eyeliner to your upper waterline to make your lashes appear fuller. Gradually progress to thin lines along your upper lash line for a subtle yet defined look. Pencil eyeliners are great for these techniques, as they offer more control and are forgiving if mistakes occur.

    Bold Flicks and Wings

    Now, let’s venture into the classic territory of bold eyeliner: flicks and wings. Begin by creating a small mark where you want the wing to end. Then, draw a line from the outer corner of your eye to the mark, forming the base of your wing. Connect this line to your upper lash line and fill in the shape. Remember, practice makes perfect, so don’t be discouraged if your first attempts aren’t flawless.

    Graphic and Geometric Designs

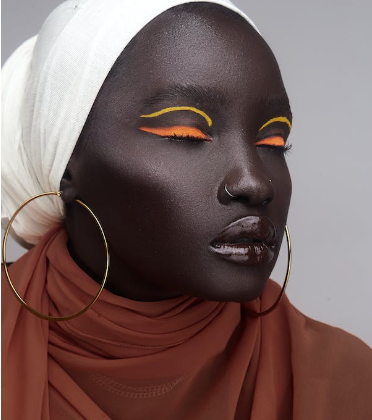
    If you’re feeling adventurous, graphic and geometric eyeliner designs can elevate your look to artistic heights. Experiment with bold shapes, like triangles, squares, or even half-moons, using your eyeliner as a creative tool. These designs are sure to turn heads and spark conversations.

    Colorful Bold Eyeliner

    Why limit yourself to black eyeliner? Explore the world of colorful eyeliners for a truly unique and bold statement. Colors like deep blue, emerald green, or rich purple can beautifully complement your eye color while adding an unexpected pop.

    Smokey and Smudged Bold Liner

    The marriage of boldness and smokiness results in a captivating and sultry look. Apply your bold eyeliner and then gently smudge it using a smudging brush or a cotton swab. This technique softens the lines, creating a seductive effect that’s perfect for evenings.

    Fixing Mistakes and Clean-Up

    Even the pros make mistakes, but the key lies in knowing how to fix them. If your lines aren’t symmetrical, don’t worry. Dip a thin brush in makeup remover and carefully refine the edges until they’re even. Concealer is your best friend for sharpening and defining the edges of your bold eyeliner.

    Accessorizing the Look

    To complete your bold eyeliner look, consider pairing it with suitable eyeshadow styles. Neutral tones can provide an elegant balance, while shimmery eyeshadows can add an extra touch of glamour. Additionally, false lashes or a few coats of mascara can enhance the overall effect.

    Longevity and Setting

    You’ve put in the effort to perfect your bold eyeliner look; now ensure it lasts all day. A setting spray helps keep your makeup in place, preventing smudging and fading. A few spritzes will ensure your bold eyeliner remains as striking as when you first applied it.

    Confidence and Attitude

    Bold eyeliner isn’t just about makeup; it’s about expressing your personality and confidence. As you walk with your head held high, your bold eyeliner becomes a statement of empowerment and individuality. Embrace the attention and let your bold look radiate your inner strength.

    Conclusion

    Mastering bold eyeliner techniques opens up a world of creative possibilities. From classic flicks to daring geometric designs, you now have the tools and knowledge to craft a range of captivating looks. Remember that practice is key, and every stroke of eyeliner brings you closer to achieving a look that’s uniquely yours. So, go ahead, experiment, and let your eyes do the talking with bold, dramatic eyeliner.

    FAQs:

    1. Can I use gel eyeliner to achieve a bold look, or is liquid liner better? Absolutely! Gel eyeliner gives you more control, making it ideal for creating bold lines and winged looks. Liquid eyeliner, on the other hand, offers precision for fine lines and sharp edges.
    2. I’m a beginner. What’s the easiest way to start with bold eyeliner? Begin with tightlining and gradually move on to thin lines along your upper lash line using a pencil eyeliner. As your confidence grows, you can experiment with bolder techniques.
    3. How can I prevent my eyeliner from smudging as the day goes on? To prevent smudging, use a primer on your eyelids before applying eyeliner. Set your eyeliner with a matching eyeshadow to enhance its longevity, and consider using a setting spray.
    4. What’s the best eyeliner shape for enhancing my eye shape? Different eyeliner shapes can enhance various eye shapes. For example, elongated wings can elongate round eyes, while thicker lines can add definition to hooded eyes.
    5. Can I wear bold eyeliner for a daytime look, or is it more suitable for evenings? You can absolutely wear bold eyeliner during the day! Just opt for slightly softer lines and consider complementing the bold eyeliner with neutral eyeshadow shades for a balanced look.

  • Accessorizing for Special Occasions: Elevate Your Outfit with Jewelry

    When it comes to dressing up for special occasions, the devil is in the details. Every accessory, every piece of jewelry you choose, contributes to the overall impact of your outfit. Accessorizing isn’t just about adding a finishing touch – it’s about transforming an ensemble into a statement. In this article, we’ll delve into the art of accessorizing, focusing on the remarkable role that jewelry plays in elevating your look.

    The Power of Accessories

    Accessories are the magic wand of the fashion world. They have the power to completely redefine an outfit, taking it from ordinary to extraordinary. Among these magical embellishments, jewelry stands out as a centerpiece of elegance and allure. Jewelry has the remarkable ability to catch the eye, draw attention, and tell a story – all without uttering a word.

    Choosing the Right Jewelry

    Selecting the right jewelry for a special occasion requires careful consideration. The key is to strike a balance between complementing your outfit and expressing your personal style. Remember, less is often more. Overloading with jewelry can overpower your outfit and make it look cluttered. Instead, focus on pieces that enhance your look subtly and tastefully.

    Matching Metals and Gemstones

    The harmony between jewelry metals and gemstones can significantly impact your appearance. While gold and silver are timeless choices, consider the color palette of your outfit. Warm tones might pair better with gold, while cooler tones can shine with silver. Gemstones add a dash of color that can either harmonize or contrast with your attire – both approaches have their merits.

    Types of Jewelry for Different Occasions

    Different occasions call for different types of jewelry. Formal events demand the elegance of classic pieces like pearl necklaces and diamond studs. Casual gatherings allow for experimentation with trendy, statement jewelry. Work-related events require a blend of professionalism and style, often achieved through delicate necklaces and understated earrings.

    Necklaces and Earrings

    The neckline of your outfit plays a crucial role in determining the necklace style that complements it best. V-necklines pair well with pendant necklaces, while strapless necklines beg for choker-style pieces. Earrings, on the other hand, frame your face and can emphasize your features. Choosing the right earrings involves considering your face shape and hairstyle.

    Bracelets and Rings

    Bracelets add an extra layer of charm to your wrists, and the choice should be influenced by your outfit’s sleeve length. Chunkier bracelets suit long sleeves, while delicate ones play well with shorter sleeves. Rings, especially statement rings, draw attention to your hands and can be conversation starters.

    Watches as Statement Pieces

    Watches aren’t just functional timepieces; they’re also powerful fashion statements. A well-chosen watch can exude confidence and sophistication. Whether you opt for a classic leather strap or a modern metal band, a watch adds a touch of authority to your ensemble.

    Layering and Stacking

    Layering and stacking jewelry is a trend that allows you to create a unique and personalized look. The key is to strike a balance between the pieces you choose, avoiding overcrowding. Mix different lengths of necklaces or stack rings on multiple fingers to add depth and dimension to your style.

    Jewelry Care and Maintenance

    To ensure your jewelry continues to shine, proper care is essential. Store your pieces separately to prevent scratching, and clean them regularly to maintain their brilliance. Gently wipe with a soft cloth or use mild soapy water for more thorough cleaning. This attention to maintenance will extend the life of your favorite pieces.

    Customization and Personalization

    For a truly special touch, consider customized jewelry. Whether it’s a name necklace, birthstone ring, or coordinates bracelet, personalized pieces hold sentimental value and make for excellent conversation starters. They showcase your personality and create a connection between you and your accessories.

    Budget-Friendly Options

    High style doesn’t have to come with a high price tag. Affordable jewelry options abound, from costume jewelry to ethically sourced pieces. With the rise of sustainable fashion, you can find jewelry that aligns with your values without compromising on style.

    Cultural and Symbolic Significance

    Jewelry often carries cultural and symbolic significance. Certain pieces can be part of traditional attire, marking important life events or affiliations. From wedding rings to religious pendants, jewelry serves as a visual representation of our beliefs and heritage.

    Jewelry as Conversation Starters

    Wearing unique and interesting jewelry pieces can open doors to intriguing conversations. Vintage or heirloom jewelry, in particular, has stories to tell. Sharing these stories can create connections, making your accessories not just adornments, but bridges to meaningful interactions.

    Conclusion

    In the tapestry of fashion, accessories are the threads that weave together an unforgettable ensemble. Jewelry, as a central and captivating element, possesses the power to elevate your outfit beyond its fabric and stitches. As you prepare for special occasions, remember that the right jewelry can be your most impactful asset, turning your attire into a reflection of your style, personality, and the significance of the moment.

    FAQs

    1. Can I mix different types of metals in my jewelry?Absolutely! Mixing metals can create a stylish and eclectic look. Just make sure to balance the pieces and consider the overall color scheme.
    2. How can I clean my jewelry at home?For basic cleaning, a soft cloth can be used to wipe away dirt and oils. For deeper cleaning, a gentle solution of mild soap and water can be used, followed by thorough rinsing and drying.
    3. What jewelry is appropriate for black-tie events?Black-tie events call for elegant and sophisticated pieces. Consider classic diamond or pearl jewelry to complement the formal attire.
    4. Are there any eco-friendly jewelry options available?Yes, sustainable and ethical jewelry options are increasingly available. Look for brands that use recycled materials and prioritize ethical practices.
    5. Can I wear statement jewelry to the workplace?Absolutely, but keep it balanced. Opt for subtle statement pieces like a bold necklace or a distinctive ring that adds flair without overpowering your professional look.
  • Winter Wonderland Makeup: Icy Tones and Sparkling Finishes

    Winter Wonderland Makeup: Icy Tones and Sparkling Finishes

    Welcome to the enchanting world of winter wonderland makeup, where icy tones and sparkling finishes come together to create mesmerizing looks. As the frosty air sets in, it’s time to transform your makeup routine to embrace the magic of the season. In this article, we’ll delve into the captivating art of winter makeup, exploring the charm of icy tones and the allure of sparkling finishes. Get ready to discover the secrets to achieving a flawless snow-kissed complexion, eyes that shimmer like snowflakes, and lips that exude winter glamour.

    The Charm of Icy Tones

    Winter’s icy palette holds a unique charm that draws us in with its cool, serene beauty. The ethereal blues, silvers, and whites evoke the tranquility of a snowy landscape. These tones capture the essence of winter, reflecting the glistening of snow and the crispness of the air. When used in makeup, these shades can transport you to a winter wonderland, making it the perfect choice for this season’s looks.

    Prepping Your Canvas

    Before diving into the world of winter makeup, it’s crucial to prepare your canvas properly. Cold weather can take a toll on your skin, so prioritize hydration and nourishment. Start with a moisturizing routine and use a primer to create a smooth base. This will ensure your makeup adheres well and stays put throughout the day.

    Creating a Snow-Kissed Complexion

    Achieving a radiant, snow-kissed complexion is the cornerstone of winter makeup. Begin with a foundation that matches your skin tone and offers a dewy finish. Use highlighter strategically on the high points of your face—cheekbones, brow bones, and the bridge of your nose—to mimic the soft glow of winter sunlight on snow.

    Eyes that Sparkle Like Snowflakes

    When it comes to winter eyes, think shimmer and glitter. Experiment with shimmery eyeshadows in silvers, blues, and frosty whites. These shades will make your eyes sparkle like glistening snowflakes. For an added touch of glamour, consider adding a touch of glitter to the center of your lids.

    Framing with Luscious Lashes and Brows

    Lashes and brows play a crucial role in framing your winter look. Coat your lashes with a volumizing mascara to add drama to your eyes. If you’re up for it, false lashes can take your look to the next level. Don’t forget to define your brows; well-groomed brows provide balance and structure to your face.

    Winter-Approved Lip Looks

    Your lip color can transform your entire makeup look. For winter, consider bold shades like deep berries and rich plums for a touch of drama. Alternatively, opt for soft nude shades that evoke the understated elegance of the season. Experiment with both metallic and matte finishes to find your perfect winter lip.

    Blushing in the Cold: Cheek Colors

    Creating a natural flush on your cheeks is essential in winter makeup. Choose blush shades that mimic the rosy hue you get from the cold. Soft pinks and light mauves work wonders. Apply blush to the apples of your cheeks and blend it out for a healthy, flushed look.

    All About Setting: Makeup Longevity

    In chilly weather, makeup longevity becomes a concern. To ensure your masterpiece stays intact, set your makeup with translucent powder. Additionally, a setting spray with hydrating properties will lock in your look while preventing it from appearing dry or cakey.

    From Day to Night: Transitioning Looks

    Winter wonderland makeup is versatile, seamlessly transitioning from day to night. To amp up your look for evening events, intensify your eye makeup by adding darker shades to the outer corners. A touch of dark eyeliner and an extra coat of mascara will take your eyes from subtle to stunning.

    Accessorizing Your Look

    Complete your winter makeup ensemble by coordinating it with winter accessories. Scarves, hats, and jewelry in complementary shades can enhance your overall look, making your makeup feel even more integrated with your style.

    Makeup-Proofing Against the Elements

    Don’t let cold weather dampen your makeup spirits. Apply a makeup setting spray with long-lasting properties to protect your look from the elements. Carry a small touch-up kit containing your lipstick and blotting paper to freshen up your look throughout the day.

    Icy Nails: Frosty and Fabulous

    Extend the winter wonderland to your nails by embracing frosty nail polish shades. Metallic silvers, icy blues, and glittering whites are perfect choices for creating nails that reflect the magic of the season.

    Confidence that Shines: Rocking Your Look

    As you step out adorned in your winter wonderland makeup, remember that confidence is the key to carrying any look. Embrace the transformation and let your inner light shine. Your makeup is a reflection of your unique beauty and style, so wear it with pride.

    Conclusion

    Winter wonderland makeup allows us to express our creativity and embrace the beauty of the season. By playing with icy tones and sparkling finishes, you can achieve captivating looks that are as enchanting as a snowy landscape. Whether you’re attending a winter gala or simply enjoying a walk in the snow, let your makeup reflect the magic of winter. So go ahead, experiment, and have fun creating your own winter wonderland masterpiece!

    FAQs (Frequently Asked Questions)

    1. Can I wear winter makeup every day, or is it more suited for special occasions? Winter makeup can be adapted for both daily wear and special events. Choose lighter shades for daytime and amp up the drama for evenings.
    2. How can I prevent my makeup from looking cakey in cold weather? Prioritize proper skincare and use hydrating products to maintain a dewy finish. Set your makeup with a translucent powder and setting spray to avoid a cakey appearance.
    3. What’s the best way to incorporate glitter into my winter makeup look? Apply glitter to the center of your eyelids for a subtle yet impactful shimmer. You can also use a glitter eyeliner to add a touch of sparkle to your eye makeup.
    4. Are there any specific lip care tips for winter makeup? Exfoliate your lips to remove dry skin and apply a hydrating lip balm before applying lipstick. Opt for creamy or satin finishes to prevent your lips from drying out.
    5. Can I wear warm-toned makeup during winter, or should I stick to cool tones? While cool tones are popular for winter, warm-toned makeup can also work if balanced well. Incorporate warm shades in moderation to add dimension to your look.
  • Daily Skincare Routine: Steps for a Healthy Complexion

    Daily Skincare Routine: Steps for a Healthy Complexion

    In today’s bustling world, maintaining a daily skincare routine might seem like an extra task, but it’s far from being an unnecessary luxury. Your skin is your body’s largest organ and a direct reflection of your overall health. Investing time in a proper skincare regimen can yield remarkable long-term benefits. Let’s delve into the essentials of an effective daily skincare routine that will leave your complexion radiant and healthy.

    Understanding the Importance of Daily Skincare

    Before we dive into the specifics, it’s crucial to comprehend why a daily skincare routine matters. Our skin is exposed to pollutants, UV rays, and environmental stressors daily. A consistent routine acts as a shield, protecting the skin from damage and premature aging.

    Step 1: Cleansing Your Face

    Cleansing is the cornerstone of any skincare routine. The double cleansing method involves using an oil-based cleanser to remove makeup and debris, followed by a water-based cleanser to cleanse the skin thoroughly. Choosing the right cleanser for your skin type ensures an effective cleanse without stripping away essential oils.

    Step 2: Exfoliation for a Fresh Start

    Exfoliation is the secret to unveiling fresh, radiant skin. There are two main types: physical exfoliation involving scrubs, and chemical exfoliation utilizing acids. Balance is key, as excessive exfoliation can irritate the skin. Consider your skin’s sensitivity and exfoliate accordingly.

    Step 3: Nourishing with Serums and Essences

    Serums and essences provide a concentrated dose of nutrients and active ingredients. Ingredients like hyaluronic acid, glycolic acid, and niacinamide address specific concerns. Incorporating vitamin C in your routine can brighten and even out your complexion.

    Step 4: Moisturization and Hydration

    Hydration is fundamental for healthy skin. Hyaluronic acid is a hydration superhero, capable of holding vast amounts of water. Choosing the right moisturizer for your skin type helps lock in moisture and maintain a supple complexion.

    Step 5: Sun Protection

    Defending your skin against the sun’s harmful rays is non-negotiable. Opt for a broad-spectrum sunscreen with SPF 30 or higher. Apply it generously and reapply throughout the day, especially if you’re outdoors.

    Step 6: Bedtime Skincare Ritual

    Your nighttime routine should focus on repair and rejuvenation. Gently remove makeup and cleanse your skin. Night creams enriched with retinol work wonders while you sleep, promoting cell turnover and reducing fine lines.

    Step 7: Eye Care and Special Treatments

    The delicate skin around the eyes deserves special attention. Combat dark circles and puffiness with eye creams containing peptides and antioxidants. Introducing retinol into your routine can combat signs of aging effectively.

    Maintaining Consistency and Patience

    Consistency is key when it comes to skincare. Results won’t be immediate, but with time, a consistent routine will yield visible improvements. Patience is your greatest ally on this journey to healthier skin.

    Tips for Addressing Specific Skin Concerns

    • Acne-Prone Skin Care: Salicylic acid and benzoyl peroxide are go-to ingredients. Avoid harsh, abrasive treatments that can exacerbate inflammation.
    • Aging Gracefully: Hydration and antioxidants are your allies. Look for products with hyaluronic acid and vitamin E to maintain youthful skin.
    • Achieving that Natural Glow: Exfoliation is pivotal. Consider chemical exfoliants like glycolic acid for a luminous complexion.

    Conclusion

    A daily skincare routine is not just about pampering; it’s an investment in the health and vitality of your skin. By following these steps and tailoring them to your skin’s unique needs, you’re paving the way for a radiant, youthful complexion that stands the test of time.

    FAQs

    1. Can I skip sunscreen on cloudy days? It’s a common misconception. UV rays can penetrate clouds, so sunscreen is essential regardless of the weather.
    2. Is it okay to use multiple serums? Yes, but layer them from thinnest to thickest consistency. Too many products might overwhelm your skin.
    3. When should I start using anti-aging products? Prevention is key. You can start incorporating anti-aging ingredients in your mid-20s to early 30s.
    4. Can I exfoliate if I have sensitive skin? Absolutely, but opt for gentle exfoliants like lactic acid. Start with a patch test to gauge sensitivity.
    5. How can I address both acne and aging concerns? Consider a balanced approach. Use products that contain both acne-fighting ingredients and anti-aging components. If in doubt, consult a dermatologist.
  • Effortless Everyday Makeup Tutorial for All Seasons

    Effortless Everyday Makeup Tutorial for All Seasons

    Welcome to the ultimate guide on creating an effortless everyday makeup look that suits all seasons. Perfecting your makeup routine doesn’t have to be a daunting task. In this article, we’ll walk you through step-by-step instructions for achieving a stunning look that enhances your natural beauty while adapting to different weather conditions. Whether it’s spring, summer, autumn, or winter, we’ve got you covered.

    The Basics of Effortless Makeup

    Effortless makeup is all about enhancing your features without looking overly done. Here’s how to achieve the look:

    Preparing Your Skin

    Before diving into makeup, start with a clean canvas. Cleanse, tone, and moisturize your skin to create a smooth base for your makeup application.

    Concealing and Foundation

    Apply a lightweight, dewy foundation that matches your skin tone. Use a concealer to cover any blemishes or under-eye circles.

    Enhancing Your Eyes

    For a fresh, awake look, curl your lashes and apply a coat of mascara. Opt for neutral eyeshadow shades that complement your eye color.

    Adding a Splash of Color to Your Cheeks

    Choose a natural-looking blush and apply it to the apples of your cheeks. This step adds a healthy flush to your complexion.

    Perfecting Your Pout

    Complete your basic makeup with a swipe of tinted lip balm or a nude lipstick for a subtle lip enhancement.

    Adapting Your Makeup for Different Seasons

    Each season calls for a slightly different makeup approach. Let’s explore how to tweak your makeup routine based on the time of year:

    Spring Freshness

    Embrace soft pastel shades on your eyes and lips. Think light pinks, peaches, and subtle shimmers to capture the essence of spring.

    Summer Vibes

    Go for a sun-kissed look with bronzer and highlighter. Opt for vibrant lip colors like coral and keep your makeup sweat-proof with a setting spray.

    Autumn Warmth

    Choose warm, earthy tones for your eyeshadow and lips. Deep reds, oranges, and browns can bring out the cozy vibes of fall.

    Winter Elegance

    Incorporate deeper, jewel-toned eyeshadows and bold lip colors. Don’t forget to moisturize well to combat the dry winter air.

    Essential Tools for Effortless Makeup

    To achieve a flawless look, you’ll need the right tools:

    Quality Brushes and Sponges

    Invest in a set of high-quality brushes and makeup sponges for seamless application.

    Makeup Miracles: Primers and Setting Sprays

    Use a primer to create a smooth base and a setting spray to lock in your makeup for all-day wear.

    Quick Tips for Busy Mornings

    Mornings can be hectic, but your makeup routine doesn’t have to suffer:

    The 5-Minute Routine

    When you’re short on time, focus on the essentials: concealer, mascara, blush, and lip balm.

    From Desk to Dinner: A Speedy Transition

    Transform your daytime look into a nighttime glam by adding eyeliner and a bold lip color.

    Embracing Your Natural Beauty

    Effortless makeup is about embracing who you are:

    Conclusion

    Effortless everyday makeup is achievable year-round. By following these steps and adapting your routine to the seasons, you can enhance your natural beauty with minimal effort.

    FAQs

    1. Can I wear the same makeup in different seasons? While some elements can remain consistent, adapting your makeup to the seasons ensures a harmonious look.
    2. What’s the key to a quick morning makeup routine? Prioritize the basics: even skin tone, defined eyes, and a touch of color.
    3. How do I prevent my makeup from melting in the summer heat? Use a mattifying primer and a setting spray to keep your makeup in place.
    4. Can I create a dramatic look with effortless makeup? Effortless doesn’t mean boring! Experiment with bold lips or smoky eyes for a touch of drama.
    5. What’s the best way to remove makeup after a long day? Gently cleanse your skin using a makeup remover and follow up with your skincare routine.
  • Skincare Routine for Winter: Keeping Your Skin Hydrated and Glowing

    Skincare Routine for Winter: Keeping Your Skin Hydrated and Glowing

    Winter’s chilly embrace brings with it a unique set of challenges for our skin. As the temperature drops and the air becomes drier, our skin often pays the price, manifesting in dryness, flakiness, and a lackluster appearance. However, fear not, for with a well-crafted skincare routine, you can ensure your skin stays hydrated and radiant throughout the colder months.

    Understanding Winter Skin Woes

    As the wind howls and the frost settles in, our skin becomes vulnerable to the harsh elements. The cold air saps away our skin’s natural moisture, leaving it parched and irritated. It’s essential to grasp the effects of these conditions to tailor a suitable skincare regimen.

    Hydration is Key

    When the winter chill sets in, your skin craves hydration like never before. The backbone of any winter skincare routine is a high-quality moisturizer. Opt for products that are rich in emollients and humectants. These ingredients create a protective barrier that seals in moisture, keeping your skin soft and supple even in the face of biting cold.

    Gentle Cleansing Practices

    While cleansing is pivotal, it’s crucial to choose a gentle, hydrating cleanser. Over-cleansing can strip away the skin’s natural oils, leading to more dryness. Strike a balance by cleansing your face twice a day, using lukewarm water, and patting your skin dry to avoid unnecessary friction.

    Exfoliation: Do’s and Don’ts

    Exfoliation aids in shedding dead skin cells and promoting a radiant complexion. Yet, proceed with caution. Over-exfoliating in winter can exacerbate dryness and sensitivity. Aim for gentle exfoliation no more than twice a week to avoid irritation.

    Layering Skincare Products

    Layering your skincare products effectively is a skill that pays off in winter. Start with lighter products like serums, gradually moving to richer ones like oils and creams. This strategic layering locks in moisture and ensures each product penetrates effectively.

    Protecting Against Harsh Elements

    Shielding your skin from the elements is vital. Even in winter, sunscreen is non-negotiable. The sun’s UV rays are still at play, and snow can amplify their effects. Additionally, cover your skin with scarves and hats to prevent windburn and dryness.

    Lip and Eye Care

    The delicate skin around your lips and eyes requires special attention. Invest in a nourishing lip balm and an under-eye cream. These targeted treatments combat dryness and fine lines, keeping you looking fresh despite the cold.

    Diet and Hydration

    Your winter skincare routine extends beyond topical treatments. Hydration starts from within, so drink ample water and savor hydrating herbal teas. Nutrient-rich foods like cucumbers, oranges, and watermelon contribute to your skin’s overall health.

    DIY Remedies for Home Spa

    Elevate your winter skincare regimen with DIY home spa treatments. Create masks using honey, yogurt, and oats. These natural ingredients replenish moisture and deliver a radiant glow. Treat yourself to these spa sessions once a week.

    Don’t Forget Hydrating Makeup

    Select makeup products that align with your skincare goals. Look for foundations and tinted moisturizers with hydrating properties. Strike a balance between makeup and skincare to achieve a flawless yet moisturized look.

    Overnight Skincare Rituals

    The nighttime is your skin’s chance to regenerate. Embrace night creams and sleeping masks that work their magic while you sleep. These products provide deep hydration and allow you to wake up with rejuvenated skin.

    Consulting a Skincare Professional

    If navigating winter skincare feels overwhelming, seek guidance from a skincare expert. Dermatologists and estheticians can recommend products tailored to your skin’s needs. Their insights ensure you’re making informed choices.

    Maintaining Consistency

    Consistency is the cornerstone of effective skincare. Don’t be disheartened if instant results aren’t apparent. Over time, your skin will respond positively to the care you provide, and the results will be worth the effort.

    Conclusion

    As winter’s frosty grip tightens, your skin doesn’t have to suffer. By embracing a comprehensive skincare routine, you can keep your skin hydrated, glowing, and resilient. Remember, your skin is your canvas; treat it with care, and it will radiate beauty regardless of the season.

    FAQs

    1. Can I use the same products year-round? While some products might work well throughout the year, winter demands extra hydration. Consider adjusting your routine to include richer products during colder months.
    2. Is it necessary to wear sunscreen in winter? Absolutely. The sun’s UV rays are present even in winter and can cause damage. Opt for a broad-spectrum sunscreen with at least SPF 30.
    3. Can I exfoliate more frequently if my skin is dry? Exfoliating too often can worsen dryness and sensitivity. Stick to gentle exfoliation a couple of times a week to avoid irritation.
    4. How do I address sudden breakouts in winter? Winter breakouts might be due to dryness causing increased oil production. Focus on gentle cleansing, moisturization, and spot treatments with salicylic acid.
    5. Can I skip moisturizer if my skin is naturally oily? No, even oily skin needs hydration. Opt for oil-free, non-comedogenic moisturizers to maintain the skin’s balance without clogging pores.

    Remember, a winter skincare routine isn’t just about appearance; it’s an act of self-care that nurtures both body and spirit. So, bundle up and let your skin radiate confidence all season long.

  • Nighttime Skincare Ritual: Nourishing Your Skin While You Sleep

    Nighttime Skincare Ritual: Nourishing Your Skin While You Sleep

    In our fast-paced lives, where time is a precious commodity, it’s easy to overlook the significance of a consistent skincare routine. However, dedicating a few moments to nurture your skin before bedtime can work wonders, as your skin’s natural rejuvenation process is most active during sleep. Welcome to the world of nighttime skincare rituals, where self-care meets science for a radiant and youthful complexion.

    Why Nighttime Skincare Matters

    Have you ever wondered why sleep is often referred to as “beauty sleep”? It’s not just a figure of speech. While you rest, your skin is hard at work repairing and renewing itself. During the night, cell turnover and collagen production are at their peak, making it an ideal time to apply nourishing skincare products. A well-structured nighttime skincare routine can significantly enhance these processes and help you wake up to a revitalized complexion.

    Step-by-Step Nighttime Skincare Ritual

    Cleansing: A Fresh Start

    The first step to any effective skincare routine is cleansing. Gently remove makeup, dirt, and impurities that accumulate during the day. Opt for a cleanser suitable for your skin type to avoid overstripping your skin’s natural oils.

    Toning: Restoring Balance

    Toning is often underestimated but plays a crucial role in restoring your skin’s pH balance. It also prepares your skin to absorb the subsequent products more effectively. Look for toners with soothing and hydrating ingredients.

    Serum Application: Targeted Treatment

    Serums are concentrated formulations designed to address specific skincare concerns. Whether it’s hydration, brightening, or addressing fine lines, serums deliver potent ingredients directly to the skin. Apply them after toning for maximum absorption.

    Moisturizing: Locking in Hydration

    Apply a nourishing moisturizer to lock in hydration. Night creams are usually richer and thicker, providing your skin with the essential moisture it needs to repair itself overnight.

    Eye Cream: Delicate Care

    The skin around your eyes is delicate and prone to fine lines. An eye cream enriched with peptides and antioxidants can help diminish puffiness and dark circles.

    Lip Care: Keeping Lips Soft

    Don’t forget your lips! Apply a lip balm or treatment to keep your lips soft and moisturized throughout the night.

    Choosing the Right Products

    Selecting the right products for your nighttime skincare routine is crucial. Consider your skin type and any specific concerns you have. Ingredients like hyaluronic acid, retinol, and vitamin C can provide various benefits, so tailor your routine accordingly.

    Benefits of Nighttime Skincare

    One of the significant advantages of a nighttime skincare routine is that your skin is more receptive to products. As you sleep, your body focuses on repairing and rejuvenating, allowing skincare ingredients to penetrate deeper for optimal results.

    Common Mistakes to Avoid

    While a good skincare routine can work wonders, overdoing it can lead to adverse effects. Avoid excessive exfoliation, as it can irritate the skin. Equally important is not to skip your nighttime routine, as consistency is key to seeing improvements.

    Beauty Sleep and Skin Health

    Quality sleep is essential for overall well-being, and its impact on your skin is profound. Poor sleep can lead to increased signs of aging, dark circles, and a dull complexion. To enhance your sleep quality, establish a regular sleep schedule and create a calming bedtime routine.

    Incorporating Relaxation Techniques

    Stress can take a toll on your skin’s health. Incorporate relaxation techniques into your evening routine, such as meditation or deep breathing exercises. These practices can help reduce stress and promote a sense of tranquility before sleep.

    Addressing Aging Concerns

    If anti-aging is a primary concern, consider adding products with retinol or peptides to your routine. These ingredients stimulate collagen production, helping to maintain your skin’s youthful appearance.

    Hydration from Within

    Remember that skincare isn’t only about external care. Drinking plenty of water and maintaining a balanced diet rich in antioxidants can contribute to your skin’s radiance from within.

    Personalized Skincare Approaches

    While general advice is helpful, everyone’s skin is unique. If you have specific concerns or conditions, consult a dermatologist for personalized guidance. Additionally, adapt your skincare routine based on seasonal changes to provide your skin with the care it needs.

    Conclusion

    A nighttime skincare ritual isn’t just a trend; it’s a science-backed approach to achieving healthy, glowing skin. By dedicating a few minutes each night to this self-care routine, you’re investing in the long-term health and appearance of your skin. So, embrace the power of beauty sleep and wake up to a refreshed, rejuvenated you.

    FAQs (Frequently Asked Questions)

    1. Can I use the same products for my morning and nighttime routines?While some products can be used in both routines, it’s essential to consider the specific needs of each routine. Nighttime products tend to be richer and more focused on repair and rejuvenation.
    2. Is it necessary to use an eye cream at night if I already use one in the morning?Yes, using an eye cream at night is beneficial because it provides extra hydration and nourishment during the skin’s rejuvenation phase.
    3. Can I skip the toning step if I’m short on time?Toning is essential as it restores your skin’s pH balance and preps it for better product absorption. If time is an issue, opt for a multitasking toner.
    4. How long should I wait between applying different skincare products?It’s recommended to wait around 30 seconds to a minute between applying different products. This allows each product to absorb properly into the skin.
    5. Are natural ingredients better for nighttime skincare?Natural ingredients can be beneficial, but what matters most is choosing products that are well-suited to your skin type and concerns, regardless of whether they’re natural or synthetic.

    Remember, your nighttime skincare routine is a form of self-care. Embrace it, enjoy it, and let it become a soothing part of your daily life. Your skin will thank you with a radiant and healthy glow.

  • Creating a Radiant Glow: Highlighter Application Techniques

    Creating a Radiant Glow: Highlighter Application Techniques

    Highlighters have become a staple in every makeup enthusiast’s collection, offering the magic touch needed to achieve that ethereal, luminous glow. When applied correctly, highlighter can transform your complexion, enhancing your features and giving your skin a radiant and healthy appearance. In this guide, we’ll delve into the art of highlighter application, covering everything from the type of highlighter to use, tools of the trade, techniques for different face shapes, and more. So, let’s embark on a journey to unlock the secrets of creating a mesmerizing radiant glow.

    Understanding Highlighter Types

    Before we dive into the application techniques, it’s important to understand the different types of highlighters available in the market. There are powder, liquid, and cream highlighters, each offering a distinct finish and requiring specific application methods. Powder highlighters provide a luminous finish and are ideal for those with oily skin. Liquid highlighters offer a more natural, dewy glow, while cream highlighters give a lit-from-within appearance. Choosing the right type depends on your skin type and the look you’re aiming for.

    Preparation: Achieving the Base

    To create a flawless highlight, it’s essential to start with a well-prepared base. This involves cleansing your face thoroughly, moisturizing to ensure hydration, and applying a primer to create a smooth canvas for makeup application. A well-prepared base not only helps the highlighter adhere better but also ensures a seamless and long-lasting glow.

    Choosing the Right Shade

    Selecting the right shade of highlighter is paramount in achieving a natural and flattering look. Consider your skin’s undertone when choosing a highlighter shade. For warm undertones, opt for gold or peachy tones, while cooler undertones can benefit from champagne or pink hues. The goal is to choose a shade that complements your complexion rather than competing with it.

    Tools of the Trade

    The tools you use to apply highlighter can significantly impact the outcome. Brushes, sponges, and even your fingers each provide a different level of intensity and diffusion. A fan brush offers a delicate application, while a damp makeup sponge creates a seamless blend. Using your fingers can provide targeted application and enhance the glow. Experiment with different tools to find your preferred method.

    Application Techniques for Different Face Shapes

    Just as makeup application varies based on face shape, so does highlighter placement. For an oval face, focus on the high points of the cheekbones and the bridge of the nose. Round faces benefit from a lifted appearance with highlighter on the temples and tops of cheekbones. Square faces can soften angles by highlighting the jawline and forehead. Heart-shaped faces should emphasize the chin and forehead while subtly accentuating the cheekbones.

    High Points to Highlight

    The key to a radiant glow lies in strategically applying highlighter to the high points of your face. These areas include the tops of the cheekbones, the bridge of the nose, the cupid’s bow, and the brow bone. By focusing on these points, you create a three-dimensional effect that catches the light and adds dimension to your features.

    Layering: Blush, Contour, and Highlighter

    Highlighter is most effective when used in harmony with other face products. The sequence of application matters: start with blush, followed by contour, and then apply highlighter. Blush adds a flush of color, contour defines your face’s structure, and highlighter imparts a luminous glow. Blending is crucial to create a seamless transition between these elements.

    Daytime vs. Evening Glow

    The intensity of your highlighter application can vary based on the occasion. For a daytime look, opt for a subtle, natural glow that catches the light delicately. Use a light hand and blend well. Evening looks, on the other hand, allow for a bolder approach. Build up the highlighter for a more intense radiance that captures attention under different lighting conditions.

    Avoiding Common Mistakes

    While highlighter can enhance your look, improper application can lead to blunders. Avoid over-application, which can result in an unnatural shine. Choosing the wrong shade can create a jarring contrast. Always blend your highlighter well to avoid harsh lines and uneven patches. Taking your time and paying attention to detail can help you steer clear of these pitfalls.

    Setting Spray: Sealing the Radiance

    To ensure your radiant glow stays put throughout the day, consider using a setting spray. This final step not only helps set your makeup but also enhances the longevity of your highlighter. Look for setting sprays that offer a dewy finish to complement the glow you’ve created.

    Highlighter for Different Skin Types

    Highlighter application can be tailored to suit various skin types. For dry skin, opt for liquid or cream highlighters to add moisture and luminosity. Oily skin benefits from powder highlighters, which help control shine. Combination skin can experiment with different types in different areas. Remember to consider your skin’s needs and adjust your application technique accordingly.

    Experimenting with Colored Highlighters

    While traditional highlighters come in shades of gold and champagne, don’t be afraid to explore colored highlighters. Shades like rose gold, blue, and purple can add a unique and playful twist to your makeup looks. Apply these shades to specific areas for a pop of color that complements your overall makeup.

    Age-Appropriate Highlighter Application

    Highlighter isn’t limited by age; it’s all about application technique. For mature skin, opt for a subtle touch on areas like the tops of cheekbones and brow bones. Avoid heavy application on fine lines and texture-prone areas. Highlighter can add a youthful radiance, so adapt your technique to suit your age and skin condition.

    Conclusion

    The art of highlighter application is a journey that lets you explore and enhance your natural beauty. By understanding the different types of highlighters, perfecting your technique, and customizing your approach based on your unique features, you can create a radiant glow that turns heads. Remember, practice makes perfect, so don’t hesitate to experiment and find the techniques that best suit your style.

    FAQs

    1. Can I use the same highlighter shade for daytime and evening looks? Absolutely! You can adjust the intensity by layering the highlighter for evening events while keeping it subtle for the daytime.
    2. Can I use my fingers to apply highlighter? Yes, using your fingers can provide targeted application and a natural finish, especially with cream highlighters.
    3. What’s the best way to blend highlighter seamlessly? Use a soft brush or a damp makeup sponge to blend highlighter seamlessly into your skin for a natural, lit-from-within glow.
    4. Is it necessary to set highlighter with a spray? Setting spray can enhance the longevity of your makeup, including highlighter, giving you a radiant look that lasts.
    5. Can I wear colored highlighters to formal events? Of course! Colored highlighters can add a touch of uniqueness to your look, even for formal occasions. Just ensure it complements your overall makeup palette.
  • Everyday Makeup Look for a Natural and Polished Appearance

    Everyday Makeup Look for a Natural and Polished Appearance

    Welcome to the world of everyday makeup – where simplicity meets elegance and confidence. Whether you’re heading to work, running errands, or meeting friends, an understated yet polished makeup look can enhance your natural beauty and boost your self-assurance. Let’s dive into the step-by-step guide for achieving that radiant everyday look that’s effortlessly you.

    Preparation and Skincare

    Before we begin applying makeup, it’s essential to lay the foundation with a solid skincare routine. Cleansing your face removes impurities and creates a clean canvas for makeup. Follow up with a moisturizer to keep your skin hydrated and primed. Applying a makeup primer not only helps makeup go on smoothly but also increases its longevity.

    Foundation and Concealer Application

    Selecting the right foundation shade that matches your skin tone is crucial. Opt for a lightweight formula that offers coverage while still allowing your natural skin to shine through. Concealer is your secret weapon for covering any blemishes or dark circles. Gently dab it onto the problem areas and blend for a seamless finish.

    Natural Eye Makeup

    For a daytime-appropriate eye look, stick to neutral eyeshadow shades. These tones complement any outfit and create a soft, alluring effect. Apply a light shade across your lid and a slightly darker shade in the crease for subtle dimension.

    Eyebrow Shaping and Defining

    Well-defined eyebrows frame your face and give it a polished appearance. Use an eyebrow pencil or powder that matches your hair color to fill in any sparse areas. Remember, the goal is to enhance your natural shape rather than creating a bold, dramatic look.

    Blush and Bronzer Application

    Blush and bronzer are your best friends for adding warmth and contour to your face. Smile and apply blush to the apples of your cheeks, then sweep bronzer along your cheekbones and jawline. Blend well to avoid harsh lines.

    Subtle Lip Enhancement

    Choose a lip shade that’s close to your natural lip color or a soft nude. Apply it evenly and top with a touch of clear lip gloss for a plump, youthful effect.

    Setting the Makeup

    To ensure your makeup lasts all day, use a setting spray or translucent powder. This step helps prevent your makeup from smudging or creasing as you go about your activities.

    Finishing Touches: Highlighting and Mascara

    Apply a hint of highlighter to the high points of your face – the tops of your cheekbones, the bridge of your nose, and your cupid’s bow. A few coats of mascara will open up your eyes and make them pop.

    Hairstyling Tips to Complement the Look

    Pair your natural makeup with a simple hairstyle like loose waves or a sleek ponytail. The goal is to maintain an effortless yet put-together appearance.

    Longevity and Touch-Up Tips

    To keep your makeup looking fresh throughout the day, carry a compact mirror, blotting papers, and your lipstick for quick touch-ups. Blotting papers help control excess oil without disturbing your makeup.

    Confidence and Individuality

    Remember, makeup is a tool to enhance your features, not mask them. Embrace your unique qualities and let your confidence shine through. Your natural beauty is what sets you apart.

    Day-to-Night Transition

    For an evening event, you can easily transform your daytime look into something more glamorous. Add a deeper eyeshadow shade to the outer corners of your eyes, apply a bolder lip color, and intensify your highlighter.

    Removing Makeup Safely

    At the end of the day, it’s crucial to remove your makeup thoroughly to let your skin breathe. Use a gentle makeup remover or cleansing oil to dissolve makeup, followed by a cleanser to wash away any residue.

    Conclusion

    Achieving a natural and polished everyday makeup look is simpler than you might think. By focusing on enhancing your features with subtle techniques, you can embrace your beauty and confidently face whatever the day brings.

    FAQs

    Q1: Is it necessary to use a primer before applying makeup? A: While not mandatory, a primer helps create a smooth base for makeup and enhances its longevity.

    Q2: Can I wear bold lipstick for an everyday look? A: Absolutely! However, for a natural look, opt for softer lip shades like nudes or light pinks.

    Q3: How do I prevent my makeup from looking cakey? A: Use light layers of products and blend well. Excess product can lead to a cakey appearance.

    Q4: What’s the best way to remove waterproof mascara? A: Use a dual-phase makeup remover specifically designed to remove waterproof mascara gently.

    Q5: How often should I clean my makeup brushes? A: Aim for cleaning your brushes at least once a week to prevent buildup of makeup, dirt, and bacteria.

    With these easy steps, you’re all set to rock an everyday makeup look that radiates confidence and showcases your natural beauty. Remember, less is more, and a touch of makeup can go a long way in enhancing your already gorgeous features.

  • Achieving a Flawless Base: Foundation Tips and Tricks

    Achieving a Flawless Base: Foundation Tips and Tricks

    Introduction

    When it comes to makeup, achieving a flawless base is the ultimate goal. A well-executed foundation sets the tone for the rest of your look, enhancing your features while providing a smooth canvas for other makeup products. In this article, we’ll delve into expert tips and tricks that will help you master the art of creating a flawless foundation base.

    Prepping Your Canvas

    Before you dive into applying foundation, it’s crucial to prepare your skin adequately. Begin by cleansing your face to remove any dirt, excess oil, or residual makeup. Follow up with a good moisturizer to ensure your skin is hydrated and plump. This step not only promotes smoother foundation application but also prevents the foundation from clinging to dry patches.

    Using a primer is the next step in your prepping routine. A primer not only helps fill in fine lines and pores but also creates a barrier between your skin and the foundation, allowing for a smoother application and better longevity.

    Selecting the Right Shade and Type of Foundation

    Choosing the right shade of foundation is a fundamental aspect of achieving a flawless base. Start by understanding your undertones – whether they’re warm, cool, or neutral – to select a foundation shade that complements your skin tone seamlessly. Don’t hesitate to get assistance at makeup counters to find your perfect match.

    Furthermore, consider the type of foundation that suits your preferences and skin type. Liquid foundations offer buildable coverage, while powder foundations work well for oily skin. Cream foundations provide a dewy finish for dry skin types. Each type has its merits, so choose one that aligns with your desired look and skin’s needs.

    Applying Foundation Like a Pro

    The application technique you use can significantly impact the final result. Whether you opt for brushes, makeup sponges, or your fingers, ensure that your chosen tool is clean. Begin by applying small dots of foundation to your forehead, cheeks, nose, and chin, then blend outward in gentle, circular motions.

    The key to a flawless finish lies in proper blending. For a natural look, focus on seamless blending along the jawline and hairline to avoid any harsh lines.

    Concealing Imperfections

    To achieve a truly flawless base, it’s essential to address imperfections using concealer. Color correctors come in handy to neutralize specific concerns like redness or dark circles. Once color corrected, apply concealer over blemishes and under the eyes, then gently blend the edges to avoid any demarcation lines.

    Setting Your Foundation

    Setting your foundation ensures that it stays in place throughout the day. Translucent powders are a staple for setting, and they help control excess shine. Apply a thin layer to avoid a heavy, cakey appearance, focusing on areas prone to oiliness.

    To prevent creasing, use the “baking” technique – apply a generous amount of powder to areas where you’ve applied concealer, let it sit for a few minutes, then dust it away with a brush.

    Contouring and Highlighting

    Contouring and highlighting add dimension to your face after creating an even base. Choose a contour shade that’s slightly cooler than your skin tone and apply it to the hollows of your cheeks, along the jawline, and on the sides of your nose. Blend thoroughly to achieve a natural shadow effect.

    Highlighter should be applied to the high points of your face – the tops of your cheekbones, the bridge of your nose, and your cupid’s bow. Blending is key, ensuring a smooth transition between contour, foundation, and highlight.

    Achieving Longevity

    If you want your flawless base to last all day, consider using a setting spray. Setting sprays not only lock in your makeup but also help control oil and maintain a fresh appearance. Give your face a few spritzes and allow it to dry naturally.

    Avoiding Common Mistakes

    Less is often more when it comes to foundation. Over-application can lead to a heavy, unnatural look. Opt for light layers and build up coverage only where needed. Ensure seamless blending at the edges for a polished finish.

    A common mistake is neglecting to blend foundation along the jawline and hairline, leading to a noticeable line of demarcation. Take the time to blend thoroughly into your neck and hairline for a cohesive look.

    Foundation for Different Skin Types

    Different skin types require tailored techniques. For oily skin, use oil-free or matte foundations and set with translucent powder. Dry skin benefits from hydrating foundations and a dewy finish. Combination skin might require different foundation types for different areas.

    Sensitive skin calls for hypoallergenic and fragrance-free options. Always do a patch test before trying a new product to ensure it won’t cause irritation.

    Flawless Base for Special Occasions

    Special occasions demand a flawless base that looks impeccable both in person and in photos. Apply foundation in layers, using thin coats to build coverage gradually. Avoid products with SPF, as they can cause flashback in flash photography.

    Natural and No-Makeup Looks

    Not every day requires a full-coverage foundation. Opt for a sheer foundation application for a more natural appearance. If you have areas of concern, use a concealer only where needed and blend well.

    Enhance your features subtly with a light touch of bronzer and a hint of blush. This approach highlights your natural beauty without heavy coverage.

    Caring for Your Skin Post-Makeup

    A flawless base doesn’t end with makeup removal. Properly cleanse your face to remove all traces of makeup, and follow up with your regular skincare routine. This ensures that your skin remains healthy and radiant even after a day of wearing makeup.

    DIY Foundation Hacks

    Create a custom foundation blend by mixing your foundation with a moisturizer for a lighter coverage. Similarly, blending foundation with a primer can create a tinted moisturizer effect, perfect for a fresh-faced look.

    Conclusion

    Achieving a flawless foundation base is a blend of proper technique, quality products, and understanding your skin’s unique needs. By following these tips and tricks, you’re well on your way to mastering the art of creating a flawless canvas for your makeup. Remember, practice makes perfect, so experiment with different techniques to find what works best for you.

    FAQs

    1. Can I use my fingers to apply foundation?
      • Yes, using your fingers can work well for foundation application, but make sure your hands are clean and the foundation is blended evenly.
    2. Is primer really necessary?
      • While not mandatory, using a primer can improve the longevity and smoothness of your foundation.
    3. How do I choose the right undertone for my foundation?
      • Look at the veins on the underside of your wrist – blue veins indicate cool undertones, green veins suggest warm undertones, and a mix suggests neutral undertones.
    4. Can I use translucent powder for touch-ups during the day?
      • Absolutely! Translucent powder is perfect for touch-ups to control shine and set makeup.
    5. What’s the best way to remove makeup at night?
      • Use a gentle makeup remover followed by a cleanser to ensure all makeup is thoroughly removed before bed.